
Today we have a Guest Post on Making Maple Syrup. It is by Cody Deuel, I hope you find it as informative as I did!
The process of boiling maple sap into syrup is pretty simple, needs very little specialized equipment and is very rewarding. However, my first attempt to do it last year was an utter disaster that resulted in no syrup at all, so let’s learn from my mistakes so that you get it right the first time. You should know too, that it takes a lot of sap to make syrup, a ratio of about 40:1, so I would start small and make enough to last your household the first year before you attempt to make enough to give to the whole neighborhood or to sell. I’m going to be sharing so much information, from such a myriad of different sources that it would not be feasible to cite them all (or for me to remember where each one was found). So these are not all my facts, but they come from folks that know what they are doing.
Making Maple Syrup
Sugar Maples (Acer saccharum) are the trees tapped for their sweet sap are very common and fairly easy to differentiate from other maples. These trees grow to be huge (50-70′) and can accommodate several taps when mature. We just tap each one once. The time to tap is in late February to early March, when it get’s above freezing during the day and below freezing at night. This naturally gives you a good chance to boil your sap as it is harvested rather than doing it all at once. We did it this way this year and were much less overwhelmed compared to last year when we started after harvesting way more sap than we were ready to process. We just boiled every night, getting ½ to ¾ of a pint finished per day.
Equipment
The equipment needed to start, making maple syrup, seems kind of daunting and expensive if you look at supplies sold at the store or online, but if you think outside the box a little and own some basic tools it really isn’t expensive at all. In fact all that we bought were the taps and a candy thermometer (optional). Here is what you need to start, making maple syrup:
- Drill, electric or hand with a 7/16” or 1/2” bit. Our source said that you needed a 7/16” bit and all I had was 1/2” and it worked just fine. I used an electric to start with, but when I had to move a couple slow taps I used an old hand drill to same effect.
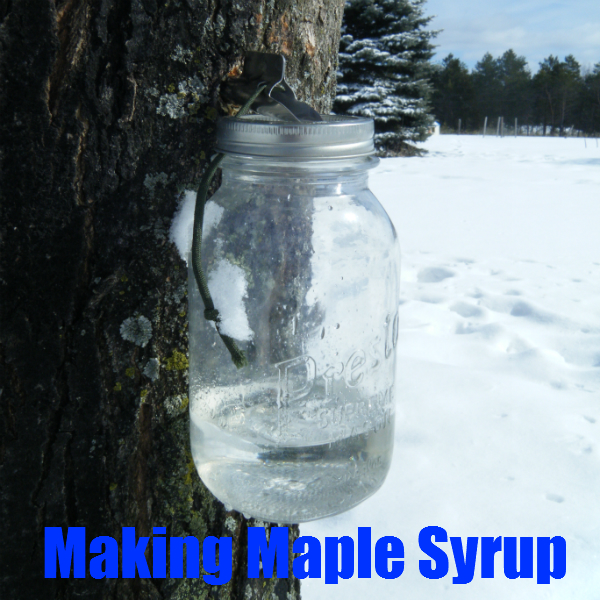
- Buckets or jugs to catch the sap coming from the taps. We wanted to do this on the cheap, so the first year we just used one gallon water jugs, modified to hang on the hooks. This year we used one quart canning jars with a piece of cord running through the holes in the taps, then under canning rings screwed onto the jar.
- Taps or spiles, as they are sometimes called. This was the only necessary piece of equipment that we bought, they came in packs of four and were about $16 a pack. I couldn’t think of a good way to make something to replace these and thought the cost was acceptable.
- Cheesecloth or something similar to strain the sap through before boiling to remove bark and debris (sometimes bugs). I actually just use a clean bandana, which is probably a little more effective as it is a tighter weave than cheesecloth.
- Candy thermometer is not absolutely necessary, but is handy (especially if want to make sugar). My wife is a little more scientific than me and she likes using it better than just eyeballing it.
Tapping The Trees
To tap the trees, go to the south side, because this side warms from the sun fastest and drill a 7/16” hole about 24-30” up from the base. Try to aline this hole with a major root or below a large limb, as this is a sort of highway for sap. The hole should be 2-2 ½” deep and at a slight upward angle to help the sap flow better. Most taps come as two pieces, the spout and the hook that the bucket hangs on, simply insert the tapered end of the spout through the ring in the hook, so that the hook faces outward. Use a soft mallet (rubber or rawhide) or a stout stick and pound the taps gently into place, not too hard, just until they are snug. I used the flat of my hatchet the first year I did this and bent up my taps pretty good. If all goes well, sap will start flowing right away, assuming it is warm enough out. Next just hang your container (bucket, jug, jar) and move on to the next tree. Depending on the weather, you will start to get a lot of sap quick, I empty the containers into an old surplus water can and by the time it is full (5 gallons) there is enough sap to make processing it further worthwhile. If you are not going to process it immediately make sure to keep it cold so that it won’t spoil. Next I pour the sap from the water can to a pitcher and pour from the pitcher to 1 quart canning jars, straining them through a bandana rubber banded around the mouth. Now your ready to start boiling and making maple syrup.
Boiling The Sap
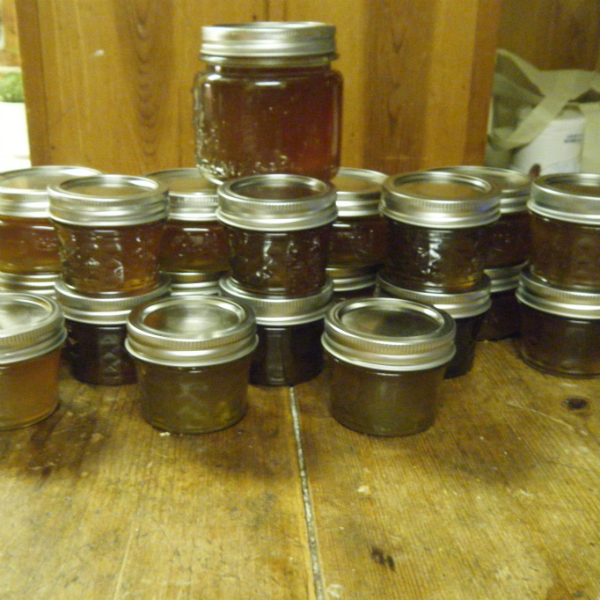 We’ve tried several ways to boil, old wood stove set up outside, single burner camping stove, indoors on our stove top and in a turkey fryer. I highly recommend the turkey fryer, it is definitely the fastest method we have tried. The old wood stove worked alright, but was too fuel dependent, we quickly burned all of the junk wood and downed branches around the homestead and weren’t nearly finished. Not wanting to burn our good split wood meant for the fireplace, I switched to the camp stove. The camp stove was too small and slow and eventually I left it unattended for too long and I burned the years harvest of syrup, very demoralizing. This year we started on our propane stove top, doing small amounts at a time, which worked well, but we were concerned about burning too much of our household propane and the kitchen was getting sticky from the sugary steam. My father in law mentioned his turkey fryer and it was just the ticket. We still do the finishing on the stove top, but the majority is done in the fryer on the porch. We’ve been boiling about 5 gallons at a time and it takes several hours. We keep it in the fryer until it is a kind of pale yellow like vegetable oil or light beer, then we bring it in to finish. To finish it the syrup should reach a temperature of 7 degrees above boiling which is 219 degrees at our altitude, however I just test it by dipping a wooden spoon into it and seeing how it coats and drips. You can make it as thin or thick as you like. We store it in ½ pint or pint jars in the refrigerator, let it cool before storing though, so that the sugar doesn’t separate to the bottom. Also, don’t add hot syrup to cold syrup or this will happen too, warm up partial containers before topping them off.
My wife is the authority on sugar making , but I’ll give you the run down. Heat the syrup to 40-45 degrees above boiling 252-257 degrees at our altitude and then pour it into a shallow pan and stir it like crazy with a wooden spoon. It will be a weird foamy substance when you first pour it and change into a kind of wet sand consistency. Keep stirring and kind of chopping it up with your spoon and it turns to clumps of sugar, kinda grind it up and you have granulated maple sugar. The whole process is kinda weird and surprising, very scientific. You get a pretty good return for the syrup used, 3 pints of syrup gave us about 2 ¾ pints of sugar, it’s worth trying out.
The Wrap-Up
I hope this was enough information for anyone who want’s to try their hand at making maple syrup. I wanted to be thorough enough that you could do it without having to look up other references. With a little ingenuity this project can be done pretty cheaply and is a good link to our American heritage . Get out and boil some sap and start making maple syrup.
You Might Also Like
Author’s Bio – Cody Deuel is an Army veteran turned stay home father. He and his family maintain a 3 acre mini farm in northern Michigan, concentrated on organic food production and preservation. Striving to pass on his passion for backwoods living, lost skills and bushcraft to his daughter. He also works as a gunsmith, does leatherwork and is a hobby writer from home. And yes he enjoys making maple syrup!
Affiliate Disclosure: I am grateful to be of service and bring you content free of charge. In order to do this, please note that when you click links and purchase items, in most (not all) cases I will receive a referral commission. Your support in purchasing through these links enables me to keep the content train rolling
More from my site
 10 Reasons Why You Should Eat Rabbit Meat
 Is your grassfed beef too gamey? How to use buttermilk to take the gamey taste out of venison and grass-fed beef.
 A History of Leatherman Tools, A Guest Post
 Guest Blog- The Basics of Raising Meat Rabbits on the Homestead, Part 2
 Food Production Systems for Backyards and Small Farms. A Review: The Finale
Listening to Mike McGrath, NJ gardener/garden show host on NPR yesterday; based on his experience/comments and a listener’s, i suggest you emphasize that the cooking down take place OUTDOORS, largely because of likely DAMAGE to household surfaces – the listener related that kitchen wallpaper just peeled – probably long, high humidity ecposure, but… I groaned at the thought of trying to get sugary accumulation out of, off of my entire kitchen. Further caution to ONLY use the turkey fryer OUTDOORS! Fire prevention!!
And Mike mentioned ‘sugar shacks’ as the original solution of most of these problems AND a community resource at times!
Fun read!
Good advice!
Ooh — pretty please post to Punk Domestics? I’m getting ready to do a roundup on maple.
I could never say no to Sean!
Thank you for sharing that info…you make it sound do-able!
How do you identify a sugar maple when it doesn’t have leaves on it, or is it OK to collect sap for maple syrup from any maple tree?
From what I have read you can make maple syrup fro the sap of other maples. Apparently Sugar Maples are the most productive. I’ll try to track down some good advice on how to ID a sugar maple.
Is there a web site showing the differ trees that can be used? I have a tree in my yard that has sap coming out of it , and often wonder if this is edible?
I’ll have to look into that for you. Thanks for reading!
If I didn’t boil the sap long enough & it has cooled, can I boil it again?
Rene,
I sent an e-mail to the author. Once he gets back to me I’ll let you know ASAP!