
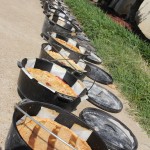
Dutch Oven Cooking
With the weather being on the nice side today I had the itch to do some Backyard Pioneering so I got the Dutch Oven out for a bit of old fashioned cooking. I’ve only used my Dutch Oven a few times but it is a skill I want to master. I think the Dutch Oven is great fun and can be a good tool for outdoor cooking. I want to use it during the Summer when it is just to hot to light the oven, or in an emergency situation like we had during Hurricane Irene a few months ago. I got the following recipe off of Mark’s Black Pot, it is an amazing site and my go to place for all things Dutch Oven. Here is the recipe:
Basic Meats and Veggies:
- A few tablespoons of olive oil
- 2-3 medium to large onions, sliced
- 3-4 boneless chicken breasts, cubed
- 3-4 potatoes, quartered and sliced
- 2-3 carrots, sliced
- 3-4 stalks of celery, sliced
- 2-3 sweet peppers, sliced
- About a half pound of bacon, cooked crispy
Flavorings (herbal-style):
- 1 heaping tablespoon minced garlic
- Liberal shakes of:
- Parsley
- Rosemary
- Oregano
- A few shakes (about a teaspoon or so) balsamic vinegar.
- And, of course, salt and pepper
Process:
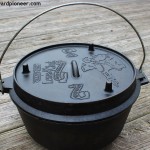
Start by lighting about 25-30 coals. While those are getting glowing and hot, you can slice up your ingredients. Put everything into the dutch oven, and put on the lid. Make a ring of about 8-10 coals and set the dutch oven on top. Put about 16-18 coals on top. Leave a few coals aside. After about 10-15 minutes, put about ten or so fresh coals on those. They’ll get lit, and by the time the coals on the dutch oven have burned down, they’ll be ready to be replenished. Cook for about 45 minutes, stirring every 15 minutes or so, until the chicken and the veggies are done.


I’m looking forward to more Dutch Oven Cooking. I’ve got some confidence going and my next attempt is going to be bread!
Affiliate Disclosure: I am grateful to be of service and bring you content free of charge. In order to do this, please note that when you click links and purchase items, in most (not all) cases I will receive a referral commission. Your support in purchasing through these links enables me to keep the content train rolling

Very Nice Mike. I just bought the book Cast Iron Cookbook by Nitty Gritty. Love cast iron cooking and glad you’re into it. Wouldn’t be a complete homestead without cast iron.
Wow! I’ve never cooked in a Dutch Oven with coals, only in the oven. I wonder if I can make my favorite short ribs in the Dutch Oven. So Mike, if my short ribs take about
2 1/2 hours to cook, would I have to keep replenishing the coals on my Dutch Oven? What do you think?
I had to keep replenishing the coals on my dish and it only cooked for 45 minutes so I think you’ll need to keep refreshing the coals. I’ve got an interview coming up with Mark Hansen who wrote the recipe that I was following. I’ll be sure to ask him for you.
Cool! I’ll be looking forward to the interview.
I havent done alot of it either, but everything I have eaten out of one has been good. Your recipe looks good. I will have to check out your guy. My guy is C. W. Butch Welch. He is from Idaho. His Email listed on one of his books is ceedubs.com.
I’ll have to check him out. Thanks for the heads up.