

Homemade Sauerkraut
As long as I can remember sauerkraut and I have been pals. Sure, I might have called him “sourcrap” as a little guy but he didn’t seem to mind. Whether on a hot dog, brats, with pork chops, or my sister-in-law’s kapusta I love it! I guess with a Grandfather named Philip Gustav my love of sauerkraut was pre-determined. I did find an interesting fact about sauerkraut; during WW1 sauerkraut was called “Liberty Cabbage” by its makers for the duration of the war.
The recipe I used was from Wild Fermentation: The Flavor, Nutrition, and Craft of Live-Culture Foods . This is my go to book if I’m looking to ferment something, say like radishes.
Step 1
- I chopped up the cabbage.

Step 2
- I salted the cabbage. I used 3 Tbs for a 5lb cabbage. I then smashed it into my crock. I’ve read that using a bit of muscle will help to draw the water out of the would be kraut.

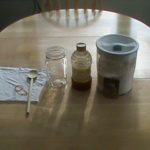
Step 3
- I found am old Correl plate that fit into my 1 gallon crock like it was meant to.

Step 4
- I found that a 1 gallon vinegar bottle fit perfectly, and will weigh the plate down nicely.

Step 5
- Now for the hard part waiting! I’ll keep an eye on for a few days to make sure that I get enough water out of the cabbage for my would be ‘kraut to be covered. If I don’t I’ll add a bit of a salt water brine to cover it up.
So there you have it, Homemade Sauerkraut!
Resources

Affiliate Disclosure: I am grateful to be of service and bring you content free of charge. In order to do this, please note that when you click links and purchase items, in most (not all) cases I will receive a referral commission. Your support in purchasing through these links enables me to keep the content train rolling


Hmm.. You’ve made this easy enough to understand that I’m going to try it too! Thanks 🙂
I love sauerkraut. Makes an awesome Reuben sandwich. Let us know how it comes out.
I’m really looking forward to pork chops with sauerkraut and applesauce.
Ha! I adore the jug of vinegar method, I want a fermenter so bad. I’ve been using old pickle jars. I’m totally a jar hoarder.
I used mason jars when I fermented radishes. Hopefully the kraut comes out good and I can use some of my hoarded pickle buckets to make it next year.
I made my first sauerkraut this year. I was going to post directions, but now I will just send everyone to you. Good post!
Chris
Thanks, Chris! I’m glad you enjoyed it.
This looks easy enough – how long does it sit in the crock? Any tips on where to keep the crock? (I.e. cold dark place, countertop is fine, etc).
Now, to find me a crock.
How long you leave it in the crock depends on a couple of things. If you’re going to be taking servings right out of the crock the kraut can stay until it starts to lose it’s crispness, that is the sign that it is starting to spoil. If you want to can it, try a sample after a week to 10 days and if you like it you can put it into jars and water bath process them. The only negative I’ve heard about canning the kraut is the heat kills the beneficial bacteria too. A crock is traditional but not necessary mason jars work well for smaller batches and 5 gallon buckets work well for BIG batches (maybe next year!).
I’ve more or less been following this route for making sauerkraut. http://www.foodinjars.com/2009/02/homemade-sauerkraut/ It has been fairly fool proof, except for the the occasional gas buildup that will cause the juice to bubble over when opening. It makes for smaller batches using quart-sized mason jars, but you follow the same directions.
My first batch was made using two cabbages jammed into the mason jar. I got a little creative making savory salts, so ended up using a batch of rosemary salt. Didn’t measure how much salt I used, but added about a spoonful for every layer I pressed into the jar. Really tasty stuff.
Now making a batch of red sauerkraut and a small test batch with cabbage and leeks.
I’ll have to give that method a try too. I’m not really wedded to one particular way and like trying out different techniques.
I never thought it was that easy, can’t wait to give it a try.
It is that easy. I’m going to do a 5 gallon bucket of it next Fall.
Inviting you the Carnival of Home Preserving on my blog every Friday. Hope to see you there. Laura Williams’ Musings
The most recent edition – http://laurawilliamsmusings.blogspot.com/2012/06/carnival-of-home-preserving-13-come.html – open until Thursday 6/7.
Thank you for the invite! I’ll be sure to post something.
I use my mom’s method. First sanitize jars and lids in boiling hot water, use tongs to lift out of water, leaving lids in hot water until ready to use. Chop the cabbage, pack tightly in mason jar, sprinkle a heaping teaspoon (eating spoon not measuring spoon) of coarse salt on top of cabbage, fill with water,use a butter knife to run around edges of jar to get as much air out as possible, screw on lid and tighten as tight as you can. Sink under water using brick, rock, etc. to hold jars under, place in cool dark place for 7 days. There may be foam floating in the water when time is up, that is from the fermenting process. Clean off jars and store until ready to use.
The amount of salt used is for quart jars. Half if using pint jars.
OOPS!! Almost forgot.. make sure lids are tight after removing from water and before storing.
I remember making kraut with my Aunt and,as I remember, we put it in canning jars and then put the jars in a tub and covered them with water and when we saw bubbles on the top of the water the kraut was done! Have you ever heard of or used this method?
I’ve read about that method but have never used it myself. Check out Sue’s reply for how she and her Mom used to do it.